Get the case files by email
The laser-cut wooden box for this phone is not in the repo; it comes by email. Leave your address and I will send the cut files, along with firmware updates and the next open source build I publish.
What it is
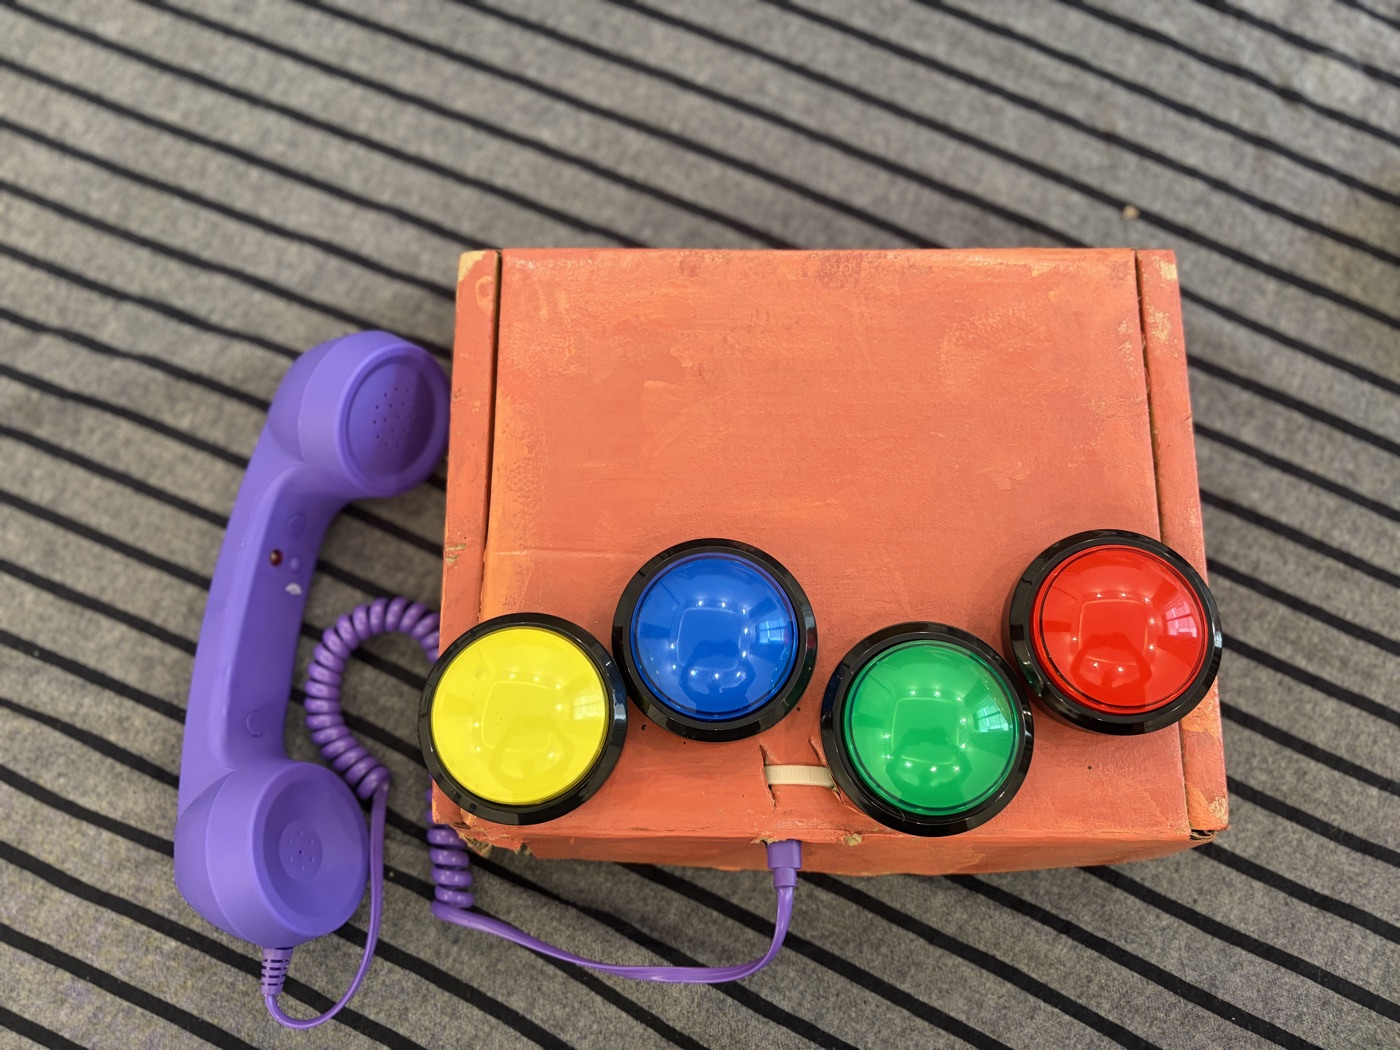
A phone for a small child. It has an old-style handset and up to four big round buttons, one for each person they love to call. Your child picks up the handset and presses grandma's button. Grandma's own phone rings, like any other call. She does not install anything.
Each button has a light. You can give each person call hours in their own time zone, so grandma's light is only on when she said she is happy to pick up. A light that is on means “you can call now”. That is a rule a small child can learn in a day.
I built it because our family is spread across countries, and I wanted my kid to be able to call them without a grown-up dialing. It is also for calling a parent when she is with a babysitter or someone else. Kid phones you can buy usually come with a monthly plan and an app. This one costs a few dollars a month in calls, and you own every part of it.
This is a _stition build guide: everything here is free and open source, the firmware, the case files, and this page. There is no kit for this one. You buy the parts yourself, from the one-click Amazon cart in the parts list or anywhere you like. Questions while you build? Ask in #kid-phone on the _stition Discord. If you want to support the project, buy me a coffee on Ko-fi or use the affiliate links in the parts list.
Private by design
- Nothing touches our servers. The phone talks only to your own Twilio account (and to a time server, to keep its clock right). I never see your numbers, your calls or your account. The source code is open source, so anyone can read it, check this, and change it.
- It can only call the numbers you added. The list lives inside a small program in your Twilio account, and Twilio refuses any other number. A child cannot dial anywhere else, and neither can anyone who somehow got the phone's login.
- Nobody can call in. The phone only makes calls. It does not ring. See the note at the very bottom if you want to change that one day.
- No recordings. Calls are not recorded or stored anywhere by the phone.
- Your Twilio password is used once. You paste your Auth Token during setup, the phone uses it to set itself up, and then forgets it. It keeps only a limited key that can change the list of allowed numbers and nothing else.
Parts
Two parts matter: the board must be the dual USB-C kind, and the handset must be a USB audio handset (one with its own USB audio chip). I have only tested the AB17X chip, but many others should work. Everything else has easy substitutes.
The easy way. One link puts the board, the handset, five buttons and the wires in your Amazon cart, about $50 in total. It gets delivered in a few days with less hassle, but you can definitely save $10 to $20 by sourcing parts locally or one at a time. My own phone came to about $25 that way.
Add all the parts to an Amazon cartI get affiliate money from this link, at no extra cost to you.
Amazon asks you to confirm before anything goes into your cart. You still need a USB-C phone charger and a USB-C data cable; most homes already have both.
| Part | What to buy | Price | Notes |
|---|---|---|---|
| Board | ESP32-S3 N16R8 dev board with two USB-C ports | $25 for 2 | The two ports are labeled COM and USB. You need both. N16R8 means 16 MB flash and 8 MB PSRAM. The linked board comes with its pin headers already soldered; many cheaper boards ship with loose pins you have to solder on yourself. |
| Handset | USB-C telephone handset with a USB audio chip | $8 | Sold as a retro phone handset for mobile phones. Mine is a LIXADA handset with the AB17X chip, which Amazon US does not sell. The linked one is a different brand, and it works too. |
| Buttons | 60 mm arcade buttons with a 12 V lamp, one per person (up to 4) | $19 for 5 | Recommended. The 12 V lamp is fine: it has its own resistor and still glows at the board's 3.3 V. No extra resistor needed. Any momentary button works, and a plain LED can stand in for the lamp; see the wiring steps. |
| Wires | Dupont jumper wires, female-to-female | $4.50 | Two wires per button for the switch, two for the lamp. The female end pushes onto the board’s pins. Cut the other end off and strip it to fix it to the button. |
| Tools | Wire strippers, and electrical tape or a soldering iron | $0 to $10 | To fix the stripped wire ends to the button tabs. Tape works; solder is better. |
| Power | USB-C power supply | $0 if you have one | Any ordinary phone charger works. It plugs into the COM port. |
| Cable | USB-C data cable | $0 if you have one | For flashing from a computer, then for the charger. It must carry data, not just charge. |
| Case | A shoebox, or the laser-cut wooden box (case files by email) | $0 or plywood | See the case section. |
| Twilio | Your own Twilio account and one US phone number | about $2 to $3 a month | About $20 up front to upgrade the account. See Twilio. |
Some links are affiliate links. As an Amazon Associate I earn from qualifying purchases: if you buy through them, the shop pays me a small cut at no extra cost to you. It funds the next guide.
There is no battery. The phone runs from the charger.
Tools
- A soldering iron and a little solder, for one blob
- A craft knife or drill for the button holes
- A computer with Chrome or Edge, for flashing and setup
- Your phone, to sign up for Twilio
Build it
-
Bridge the USB-OTG pad
This is the only soldering you have to do. On the back of the board, near the two USB-C ports, there are two small pairs of pads. One is labeled USB-OTG, the other IN-OUT. Put one blob of solder across the USB-OTG pad so its two halves are joined.
This lets the board send 5 V out of its USB port to power the handset. The IN-OUT pad does nothing for the handset, so you can leave it alone. If you skip this step, the handset gets no power and the phone stays silent.
No soldering iron? The solder blob is the only way I have tested. Two things might work instead, but I have not tried them: a conductive ink pen (silver ink) painted across the pad, or a scrap of copper tape. Copper tape is unreliable on pads this small, so I do not recommend it. If you can, borrow an iron or ask a maker space; the blob takes a few seconds.
Never plug a computer into the USB port. With the pad bridged, that port pushes 5 V out and would push it into your computer. Also do not feed power into the board's 5V pin while it is plugged in.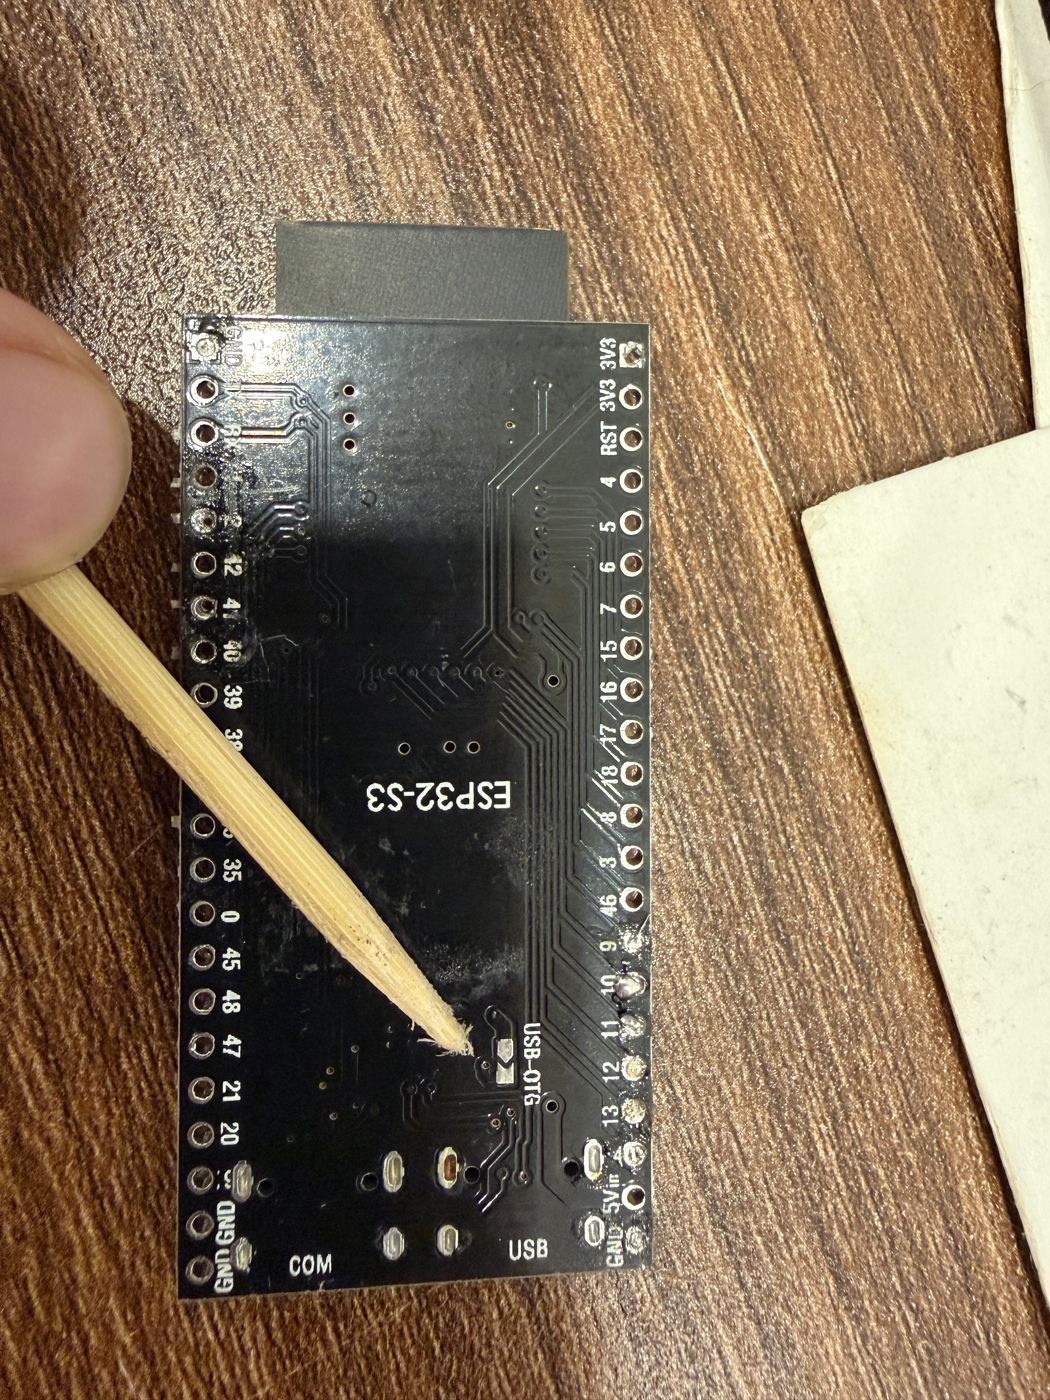
Back of the board. The toothpick points at the USB-OTG pad, just above the USB port. One blob of solder joins its two halves. -
Learn the two ports
The board has two USB-C ports. This is the rule that matters most:
- USB port: the handset, and only the handset.
- COM port: the computer (for flashing) or the charger (every day).
Never plug a computer into the USB port. With the pad bridged, that port pushes 5 V out and would push it into your computer. Also do not feed power into the board's 5V pin while it is plugged in.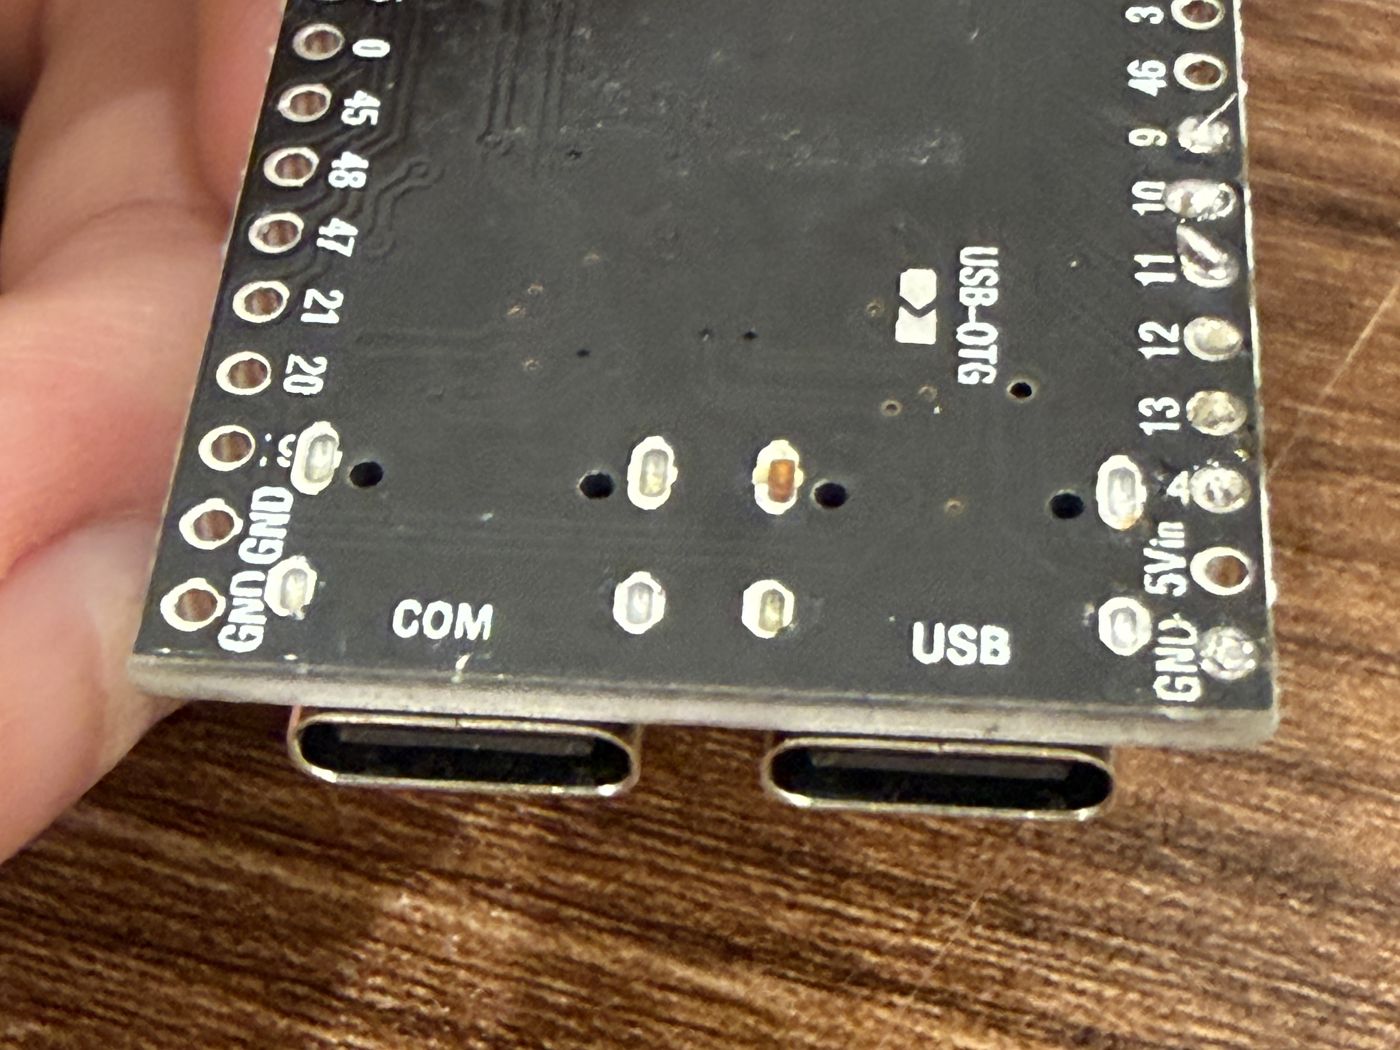
Seen from the back: COM on the left, USB on the right. Handset on USB. Computer or charger on COM. -
Wire the buttons
Each arcade button has two parts with tabs: the switch (the black microswitch block at the bottom) and the lamp (the holder with the bulb, which clips into the middle). Both twist or pull out, which makes wiring easier.
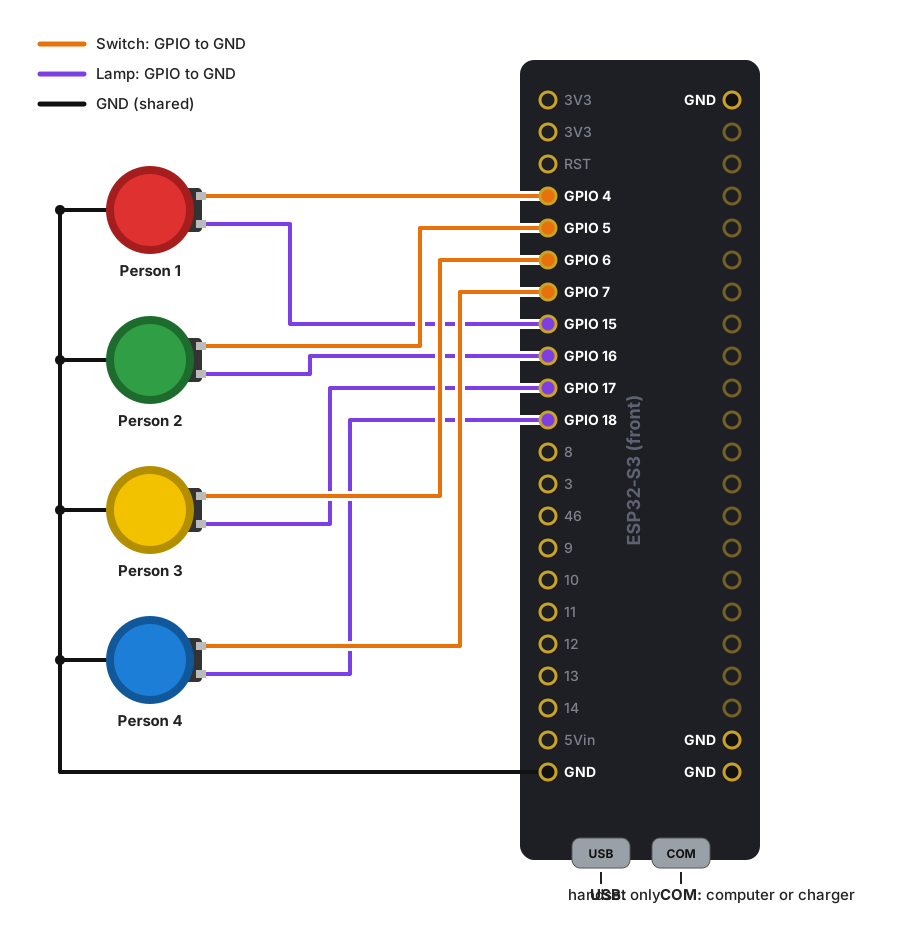
For the switch, run one wire from a board pin to one tab and a second wire from the other tab to GND. It does not matter which tab gets which.
Use female jumper wires: the female end pushes onto the board’s pin, and you cut the other end off and strip about 1 cm of bare wire with wire strippers. Wrap the bare wire through the hole in the tab. Soldering it there is best. No iron? Twist it tight and wrap it with electrical tape; that works, it is just easier to knock loose.
Arcade buttons are what I recommend, because they are big and easy for small hands. But any momentary button works: anything that connects the pin to GND while pressed.
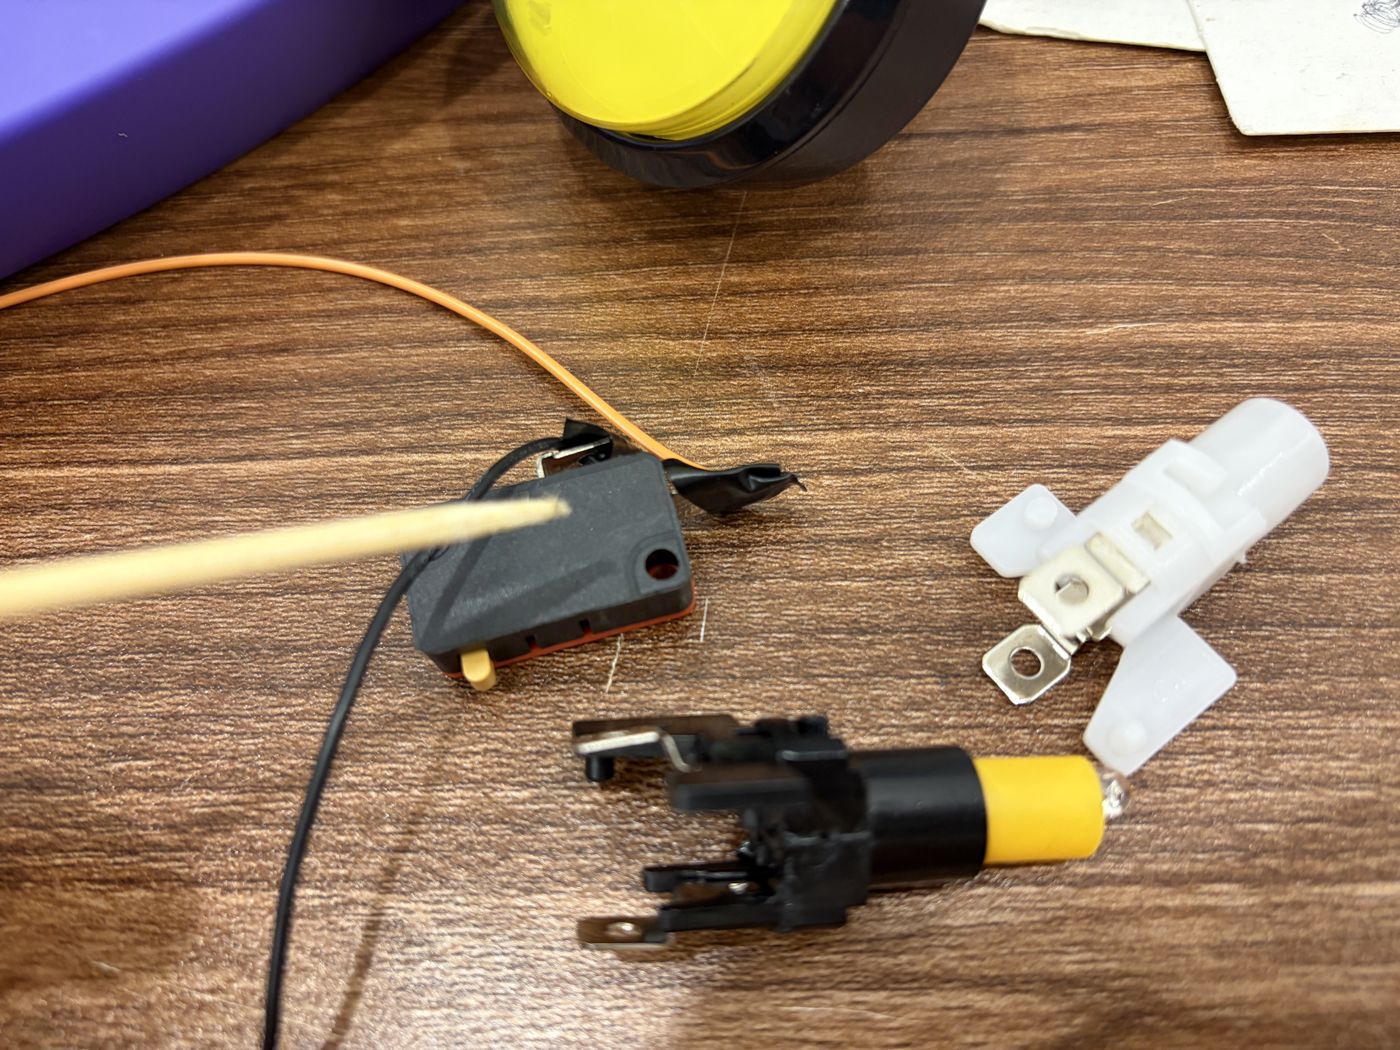
A 60 mm button taken apart: the switch (pointed at), the lamp (bottom) and the plunger housing (right). -
Wire the lights
For each lamp, run one wire from its board pin to one lamp tab and a second wire from the other lamp tab to GND. No resistor. The lamps only work one way round. If a lamp stays dark once the phone is set up and that person is available, flip its two wires.
No lamp in your button? A plain LED works instead: board pin to a 330 ohm resistor, to the LED's long leg, short leg to GND. The firmware works the same either way.
You can wire fewer than four. Buttons and lights you do not connect are simply ignored.
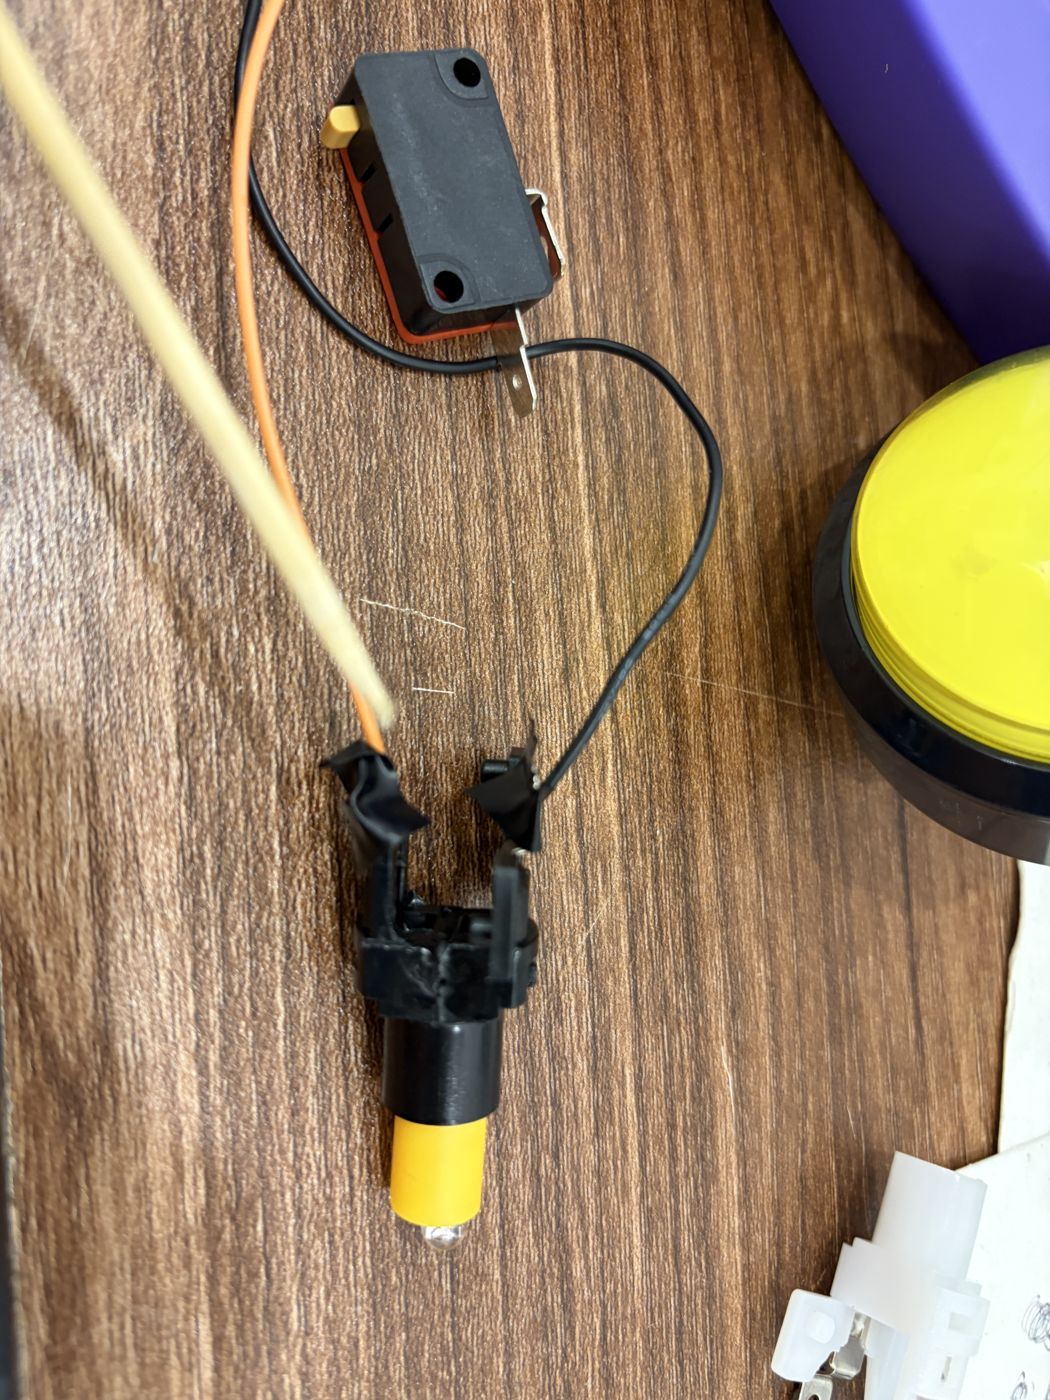
Switch and lamp wired with electrical tape, no solder. All eight signal pins sit next to each other on one side of the board.
| Person | Button switch | Button light | Notes |
|---|---|---|---|
| 1 | GPIO 4 and GND | GPIO 15 and GND | |
| 2 | GPIO 5 and GND | GPIO 16 and GND | |
| 3 | GPIO 6 and GND | GPIO 17 and GND | |
| 4 | GPIO 7 and GND | GPIO 18 and GND |
The board has several GND pins. Any of them will do, and the wires can share one if you join them.
Set up a Twilio account
Twilio is the phone company in the middle. Your toddler phone talks to Twilio over the internet, and Twilio places a normal call to grandma's phone. You need your own account. This is the part where most people get stuck, so take it slowly, and do it before you flash the phone.
Twilio changes its Console often. The menu names below were right when I wrote this; if yours look different, search the Console for the same words.
- Sign up at twilio.com. You will confirm your email and your own mobile number.
- Upgrade from the trial. A new account starts as a free trial. A trial can only call numbers you have verified one by one, and every call starts with a recorded trial message, which will confuse a small child and the grandparent. Upgrade by adding a payment method and some credit (about $20 is the minimum). Console > Upgrade account
- Fill in your regulatory details. Twilio has to know who you are before it will sell you a phone number. It asks for your name, address and similar details in a customer profile. Approval can take a little while. Console > Trust Hub > Customer Profiles
- Buy one US phone number that can make voice calls. It costs about $1.15 a month. This is the number grandma sees when the phone calls her, so save it in her contacts as your child's name. Console > Phone numbers > Set up a new phone number (Buy A Number), with Voice checked
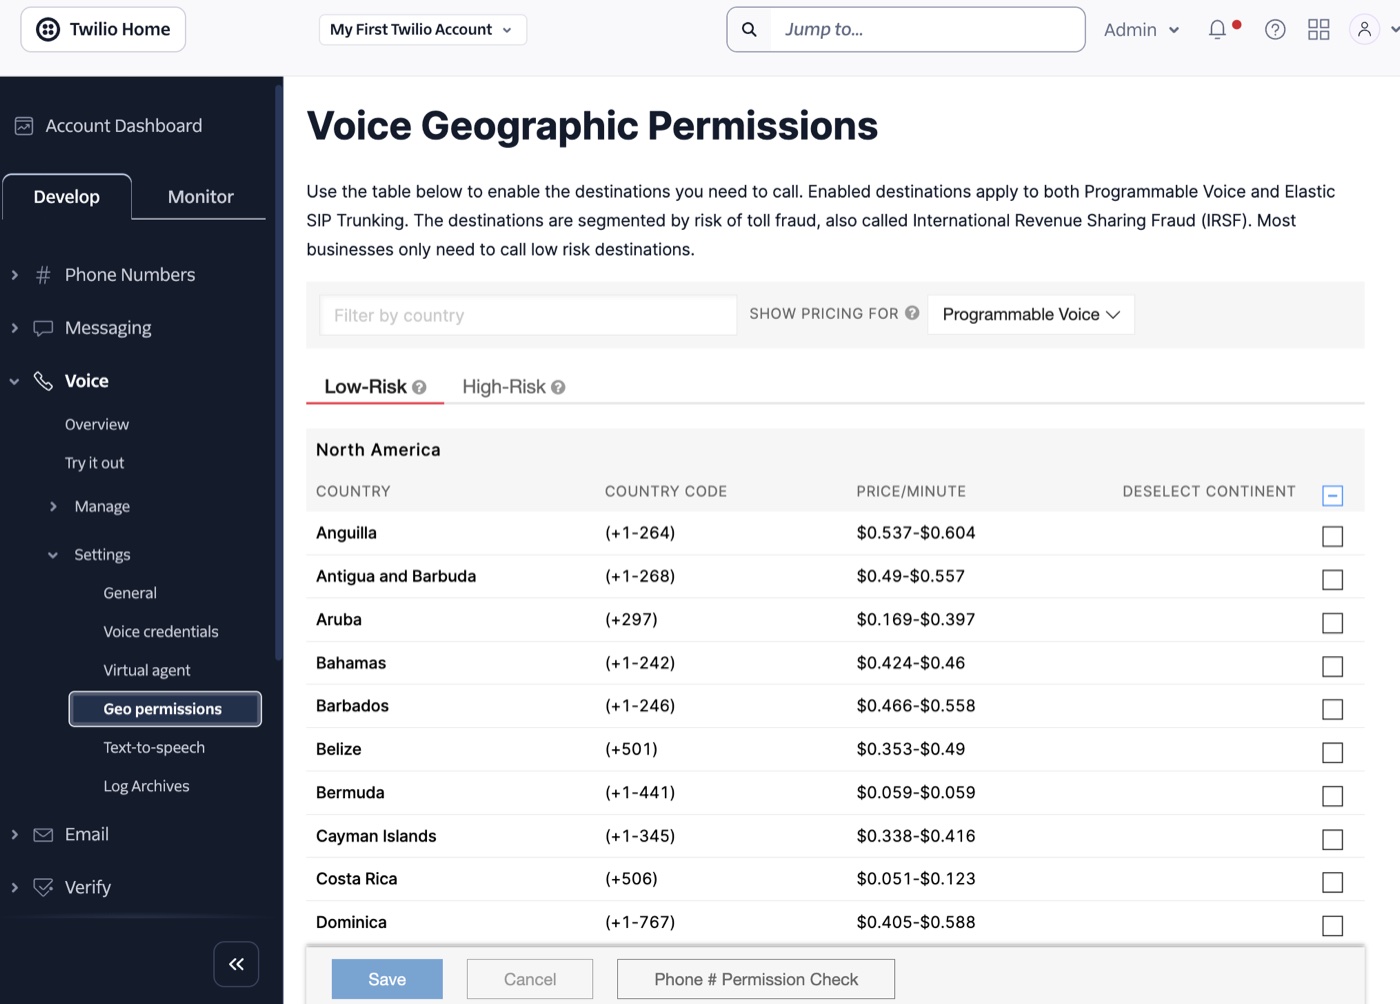
- Turn on calling to the right countries. Twilio blocks calls to many countries by default. Turn on the countries your family lives in. The phone cannot change this setting for you. Console > Voice > Settings > Geo permissions
- Set a spending cap. Add a usage alert so Twilio emails you if spending passes an amount you pick (say $10 a month), and leave auto-recharge turned off. With auto-recharge off, the most you can ever spend is the credit you added. Console > Billing > Usage > Triggers > Create a usage trigger (category Total Price, trigger by Price, recurring Monthly)
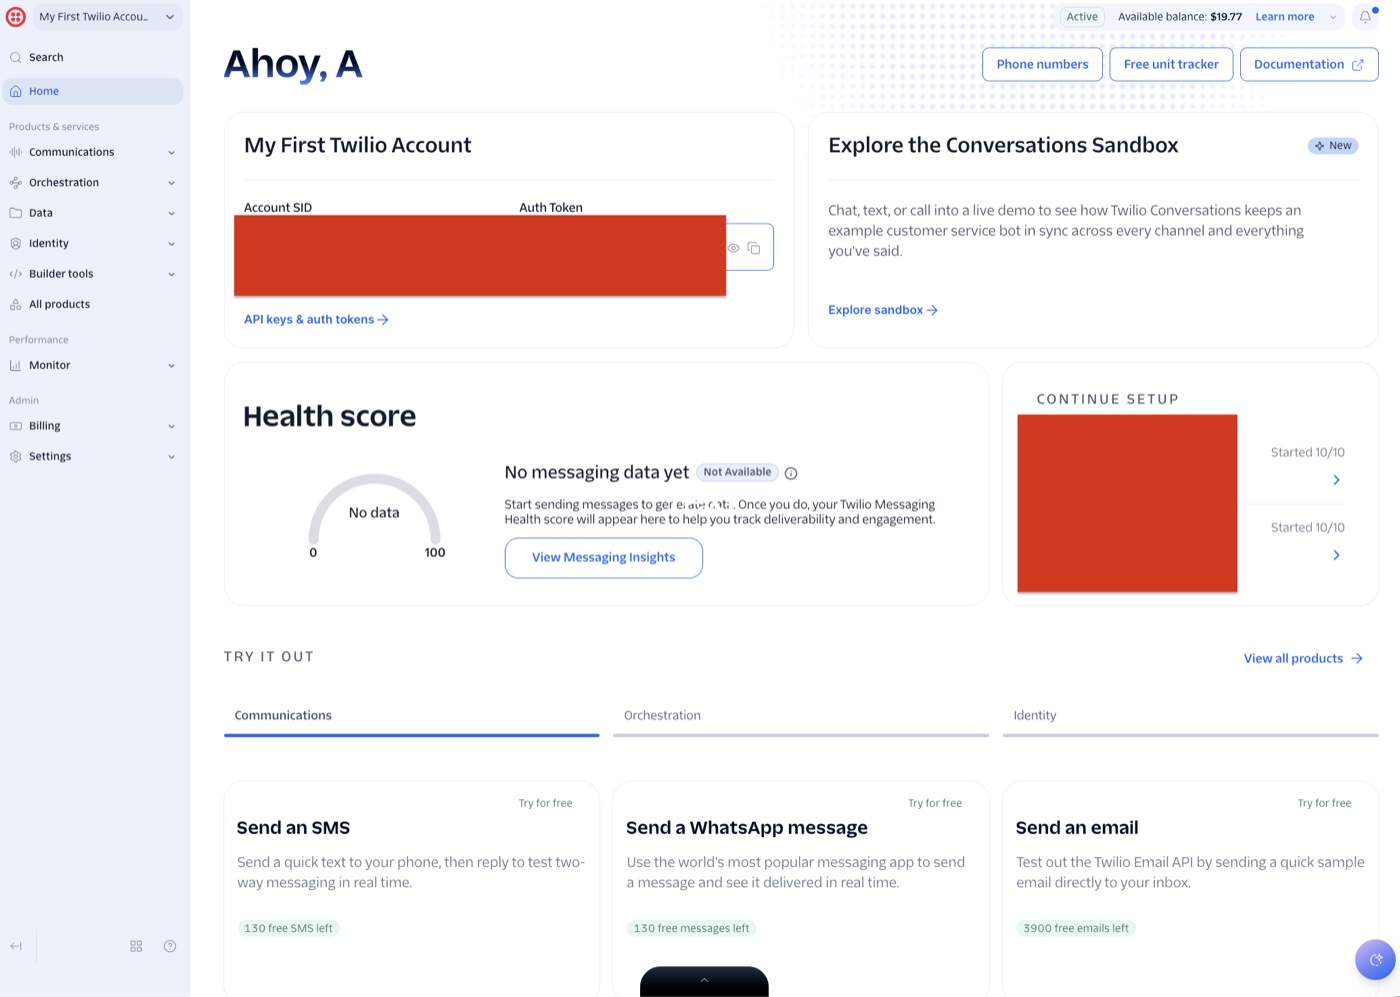
- Find your Account SID and Auth Token. They are on the Console home page, under account info. Keep this tab open; you will paste both into the phone in a minute. Treat the Auth Token like a password.
Flash it and set it up
The firmware is open source at github.com/AllanBinder/kid-phone. You do not need to install anything to flash it. The installer runs in Chrome or Edge.
- Join your WiFi. Right after the install, the installer asks for your WiFi name and password. Type them in. The phone joins your home WiFi and remembers it.
- Open the setup page. Press Visit device in the installer, or type kidphone.local in your browser. If that name does not open, use the number address the installer showed you (it looks like 192.168.1.23). Your computer must be on the same WiFi.
- Connect Twilio. Paste your Account SID and Auth Token, add at least one person (below), and press Connect. The phone now sets up your Twilio account by itself: a private login for the phone, a small program with the list of allowed numbers, and the limited key it uses later. It takes about a minute. The page shows each step in plain words.
- Plug in the handset (into the USB port). The earpiece stays silent until you press something; that is normal. Pick it up and press a lit button: it calls. Or press Call on the setup page to test without the handset.
More than one WiFi. The phone remembers up to 5 networks and joins the strongest saved one it can see. To add grandma's WiFi before a visit, or a second router, open the setup page, press WiFi settings at the top, scan, and add it while the phone is still on your home WiFi. Each saved network shows how its last connection try went, so a wrong password is easy to spot.
Add the people
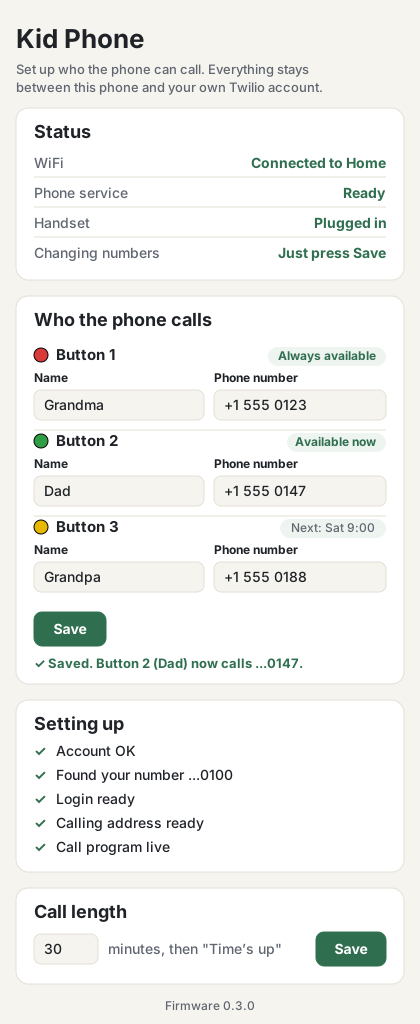
The setup page has four slots, one per button. For each person, type a name and their full number with the country code, for example +1 555 123 4567 for the US. For someone abroad, start with their country code. One person is enough to start.
Call hours (optional). For each person you can turn on “only when they're available”. Pick their time zone (theirs, not yours) and the times they are happy to take calls. There are presets like Weekday evenings, Weekend mornings and Every day, daytime, or you can set your own days and times, up to four windows. A window like 22:00 to 01:00 runs past midnight. Inside their hours, their button light is on. Outside, it is off and the button does not call.
When the phone has just started and has not yet set its clock from the internet, everyone counts as available. A clock problem never blocks a call.
Changing things later (a new number, a new name, different hours) needs no token. Just press Save. The phone updates its allowed list in Twilio within a few seconds using its limited key, then shows a green line like “Saved. Button 2 (Grandma) now calls ...1234”. If it could not, it says “Not saved” in red with the reason, keeps what you typed, and offers Try again or Use the Auth Token instead. If the limited key ever stops working (for example, you deleted it in the Twilio Console), the page asks for your Auth Token once and makes a new one.
Case and mounting
- Cord strain relief. Zip-tie the handset cord to the case just inside the hole it comes through, with a little slack between the tie and the board. Then a yanked cord pulls on the case, not on the board’s USB socket.
- The free version: a shoebox. Cut holes in the lid for the buttons and stiffen the lid with a second layer of cardboard glued on. Put the board inside, close it with tape or screws so little fingers cannot reach the wires. A photo of each person above their button works better than a name, because a small child cannot read yet. Tape or laminate the photos so they survive.
- The wooden box. A laser-cut plywood box that stands up with the buttons facing forward and the handset resting on top: 280 x 202 x 80 mm, finger joints sized for 4.6 mm plywood, engraved frames for an Instax mini photo above each button, and slots to zip-tie the board and the cord inside. The cut files come by email: leave your address at the top of this page and I will send them. No laser cutter? A maker space or an online laser cutting service can cut it from the file.
- Wall mounting (recommended). You do not have to, but I recommend it. While I was testing, my 4-year-old ran off with the handset in her hand and nearly pulled a laptop off the table. Twice. A toddler and a phone cord will always find the end of the cord. Fixing the phone to the wall at your child's height, with the power cable routed out of reach, stops that.
Using it
- Lights mean “on”. A lit button means that person can be called right now. The earpiece is silent while the phone is waiting, in every state, so a handset left off the hook does not beep all day. If all the button lights are off, either the phone is not working (no WiFi, not set up, no power) or nobody is available right now. Press a button and the phone says which.
- Make a call. Pick up the handset and press a lit button. It calls straight away, on the press. Your child hears ringing, then the person. If the phone cannot call, it says why in a short sentence, plays a short busy tone, and goes quiet again.
- End a call. Press any button, or wait for the other person to hang up. Putting the handset down does not end the call yet, because this version has no hook switch.
- Bedtime. On the setup page, turn on Bedtime and pick when the lights go off at night and come back on in the morning, in your own time zone. While it is bedtime every button light is off, and a press says “It’s sleep time. You can call in the morning.” A call that is already going when bedtime starts is not cut off. Bedtime is off until you turn it on.
- Call time limit. Calls end on their own after 30 minutes, and the phone says “Time's up! Press the button again to call again.” You can change the limit on the setup page, from 1 to 120 minutes. For 3 seconds after a call ends, and while the phone is talking, presses are ignored, so a child mashing buttons cannot fire off a burst of calls.
- Start over (factory reset). On the setup page, open the Advanced card, type RESET in capitals (that turns the button on), and press Factory reset. If you cannot reach the setup page (for example, the WiFi changed), hold the BOOT button on the board itself for 10 seconds. It sits inside the case, away from little hands. The light on the board blinks amber from about 1.5 seconds; let go before 10 seconds to cancel. After the erase, let go of BOOT and the phone restarts ready for setup. Either way it forgets your WiFi, the Twilio connection, the people, their times and the call length. Nothing in your Twilio account is deleted. The big contact buttons never reset anything, and holding one does nothing.
- The light on the board also tells you its state: green means ready, blue means WiFi is fine but Twilio is not set up, blinking red means no WiFi, pulsing white means a call is on.
Updates on this build and what comes next
I am still adding to this phone (a hook switch, more case options) and building more open source projects. Get an email when something ships.
Troubleshooting
When something is wrong, the phone tells your child in words instead of beeping, so a grown-up can fix it. The setup page always shows more detail.
| The phone says | What it means | What to do |
|---|---|---|
| Nothing, and no button lights are on | The phone is not working (no WiFi, not set up, no power), or nobody can be called right now. | Press a button. The phone says which one it is. If it says nothing at all, check the charger and the COM cable. |
| “Time's up! Press the button again to call again.” | The call reached the time limit (30 minutes unless you changed it). | Nothing is wrong. Press the button to call again, or raise the limit on the setup page. |
| “It’s sleep time. You can call in the morning.” | It is bedtime. All the lights are off. | Nothing is wrong. The lights come back on at the time you set. Change or turn off Bedtime on the setup page. |
| “They can't talk right now. Try again later.” | That person is outside the call hours you set. Their light is off. | Wait for their light, or change their hours on the setup page. |
| “They didn't answer the phone.” | The call rang out, the line was busy, or they declined it. | Try again later. If it happens on every call to one person, check their number on the setup page. |
| “The phone isn't connected. Ask a grown-up for help.” | No WiFi, or WiFi without internet. A blinking red light on the board means no WiFi at all. | Check that your router is on. Restarting the router fixes a lot of these. If the WiFi name or password changed, see the WiFi questions below. |
| “This phone isn't ready yet. Ask a grown-up for help.” | Twilio setup has not been done yet, or the button pressed has nobody on it. | Open kidphone.local and finish setup, or add a person to that button. |
| “Oops, that call didn't work. Let's get a grown-up to help.” | Twilio refused the call: a login problem, an account problem (out of credit, suspended) or a missing permission. | Open kidphone.local. Try it shows the exact reason for the last call. Fix it in the Twilio Console, or press Run setup again. Check your Twilio balance too. |
I press a lit button, it starts to call, then it drops and says the phone can't make calls.
It rang and rang, then went quiet without saying anything.
The phone joined the wrong WiFi, or one far away.
The phone will not connect to WiFi.
I changed a number and pressed Save, but the button still calls the old one.
Setup failed partway through.
I hear nothing at all, even after pressing a lit button.
kidphone.local will not open.
A button light never turns on.
The board does not show up when I click Install.
Still stuck? Post in #help on the Discord with what the setup page says, and someone will take a look.
What it costs to run
About $2 to $3 a month for a family that calls a few times a week: $1.15 for the number, plus a small charge per minute. Calls to other countries cost more per minute than calls inside the US. With auto-recharge off, you never spend more than the credit you put in.
Help and community
Stuck, or built one and want to show it off? Join the _stition Discord. There is a channel for each build, other builders answer questions too, and I drop in regularly. For bugs in the firmware, open an issue on GitHub (kid-phone issues). Pictures of your build are the best contribution of all.
Advanced: letting family call in
The phone only calls out. It cannot ring, and nobody can call it. That is on purpose. Nobody should be able to call a child's phone unless a parent decides that and does the work to set it up.
It is technically possible. The phone would sign in to your Twilio phone line so Twilio knows where to find it, the small program in your Twilio account would pass along calls to your Twilio number only from numbers on your list, a small speaker and amplifier would act as the ringer, and a switch in the handset cradle would answer the call when the handset is lifted.
None of that is included, and none of it is turned on by default. If you build it, you are choosing who can reach your child, so keep that list short.
Open source. Firmware under the Apache License 2.0, hardware files under CERN-OHL-P v2, and this guide under CC BY 4.0. Copy it, change it, build one for every grandparent; just credit the original. Source and files: github.com/AllanBinder/kid-phone. Not sponsored by Twilio or any other company.